Optimizing Web Images in Photoshop
类型:【转载】
原文作者:【JOSHUA KROHN】
日期:【NA】
原文地址:https://madebysidecar.com/journal/optimizing-images-for-the-web-in-photoshop#
Images. Whether it’s an illustration, lifestyle or product photo, or a complex diagram, images make up a huge part of our online experience. When done right, imagery elevates that experience, supports the content, and gives us an emotional connection to what we’re reading. Because images are so crucial to our online experience, it’s important that they always look their best.
There are two main factors that dictate how images look on the web: quality and file size. A poor quality image results in something that looks pixelated, blurry, or has visible noise artifacts. The fix? Use an image that has a higher quality.
But that presents another problem. A higher-quality image means its file size is larger. Larger images take longer to download. And on mobile where bandwidth is limited and speed matters, this becomes an even bigger issue.
So how do we find the right balance between image quality and file size? That’s where image optimization comes in.
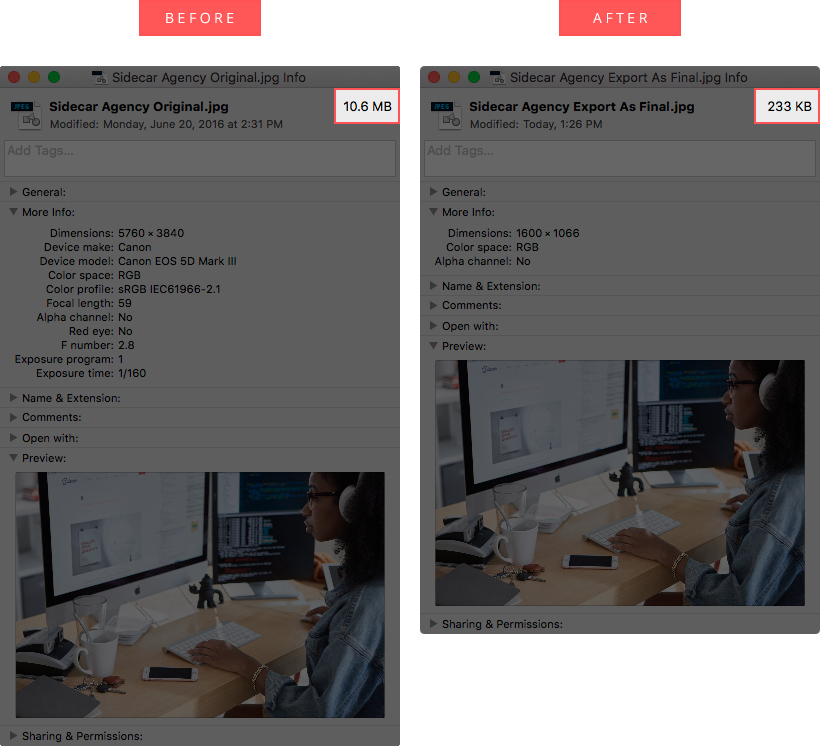
Let’s start with this image for a digital agency’s website.

It’s a great photo straight from the camera. But uploading this photo without optimizing it would be not-so-great. Let’s take a closer look to find out why.

Look at that file size. 10.6 MB is way too big for nearly every online use case. It all depends on your design layout but I try to keep file sizes for the largest images smaller than 1 MB, aiming for under 500 KB if possible. The smaller you can make it (without sacrificing too much quality), the better.
Pro-tip: When optimizing images for the web, it’s important to start with the largest file size possible. This usually means a larger dimensional image. You can always make it smaller while maintaining its quality. But if you start with a small image and try to make it bigger, you’ll quickly lose image quality. And no amount of optimization will make it look good.
Instead of resizing the image first (by going to Image > Image Size), we can do all of the resizing and optimizing in a single dialog box. Hooray for saving an extra step!
Photoshop has export options specifically designed for web images. Newer versions of Photoshop have two different ways to do this. One is called “Export As” and the other is called “Save for Web (Legacy).” In older versions of Photoshop, it’s called “Save for Web & Devices.” We’ll go through both options.
Using “Export As”
Go to File > Export > Export As…

There are three main parts to this window. The left side is used for exporting images with the same aspect ratio for different display resolutions. (That’s a topic for another article.) For now, notice the file size of the original image: 11 MB! The middle section is the preview area for the image. You can zoom in and out to check the quality of the image. The right side is where the magic happens.
Under the File Settings section, choose JPG from the “Format” drop-down menu. We’ll talk about file types in a bit. For “Quality,” make it 100%. We’ll come back later and see how this affects quality and file size.
The next section is Image Size and here’s where you need to know how big your final image is. For the purpose of this tutorial, this image needs to be no larger than 1600 pixels wide. Change the Width to 1600 px and you’ll see the Height and Scale % automatically adjust to the same aspect ratio.

Changing the dimensions of an image is a great first step towards optimization. Check out the file size in the left side of the window. The image now weighs in under 1 MB, which is a good improvement. But remember, the smaller we can make the file size without losing too much quality, the better.
Remember that “Quality” setting? Let’s go back to that setting and see if we can optimize further. First, in the middle preview window, zoom in to 100% so we can see how our changes affect the quality. Under the File Settings section, change the quality to 0% and check out the preview image.

We may have gone too far. The file size is phenomenal (only 54 KB!) but the image quality is junk. Notice all the blocky artifacts? Yuck. Let’s change the quality to 60% and see how that looks.

Oh yeah, that’s much better. The file size is still great (294 KB) and the image quality is fantastic. Drag the preview image around to check the other parts of the image to make sure it’s all good. It looks great to me, so now select “Export All…” and name your new image.
A quick comparison shows we reduced file size by more than 97%! This translates to a much speedier (and enjoyable) online experience.
Using “Save for Web”
The process is almost the same for “Save for Web” so let’s take a look at how to optimize using that option.
Pro tip: If you have the choice, go with “Export As” instead of “Save for Web.” Not only do you have options for exporting images for retina displays, but the dialog box comes up quicker, especially when optimizing large images. Plus, Adobe has labeled this option as Legacy. Who knows how long it’ll stick around.
Go to File > Export > Save for Web (Legacy). In older versions of Photoshop, go to File > Save for Web & Devices. Let’s take a look at this window.

As you can see, there’s a lot more to see and do in this window. Don’t worry about most of it. Here’s how to optimize images from this window.
First, make sure the “Optimized” tab is selected from the tabs above the preview image. In the bottom-left corner of the preview image, notice the file size of the original image: 10.51 MB.
In the upper-right area of the window, we have a drop-down for file types. Make sure JPEG is selected. For “Quality,” make it 100. We’ll come back to this setting last to choose the final image quality.
In the lower-right area of the window is the Image Size section. We need an image width of 1600 px, so change the “W” to 1600, making sure the “constrain portions” icon is selected (it’s a linked chain). The “H” and “Percent” automatically adjust to the same aspect ratio.

The image now weighs in under 1 MB, but let’s go back up to the “Quality” and reduce it to get an even smaller file size. Make sure the preview window is zoomed in to 100% so we can see how our changes affect the quality. Let’s see how 0% quality looks again.

Yep, still bad. Let’s up the quality to 60% and check out the image. One thing you might find useful about this window is by selecting the 2-Up tab, you can compare the original image next to the optimized image. Drag the optimized image around and the original image will mirror your movements.

Like before, we see the file size has been reduced while maintaining good image quality. Once things look good, select the “Save…” button (not the “Done” button), and name your new image.
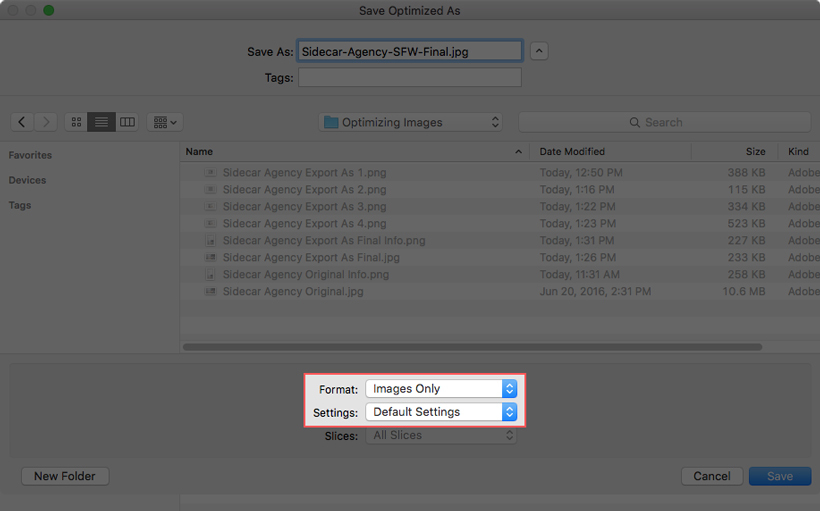
There are a couple more options in this dialog box. In the Format drop-down menu, make sure “Images Only” is selected. For Settings, you can select “Other” to change how the files are named.

By default, Photoshop replaces spaces with hyphens. You can change that and other options here. Once you have things like you want them, select the “Save…” button in the “Save Optimized As” dialog box.
Another comparison shows a huge reduction in file size, even a tiny bit more than the “Export As” process.

A word about file types
Each optimization method also lets you choose the file type. We used JPG for our example image. In “Export As,” we get PNG, JPG, GIF, and SVG. In “Save for Web,” we get GIF, JPG, PNG-8, PNG-24, and WBMP. 100% of the images that I’ve optimized and exported for the web have been either JPG, PNG, or GIF. Let’s talk about those file types and when you’d use each one.
JPG (or JPEG)
JPG is the most popular file type for web images today. It’s a lossy compression file type, which means every time you save the JPG, it loses a bit of quality. That’s due to compression. In our example image, we exported it as a JPG with 60% quality (or 40% compression). That seems like a lot but since there’s not a huge difference in visual quality, I find that saving with 60% quality is the perfect balance between quality and file size.
Can you spot the compression difference between these two images? One side is saved at 100% quality; the other at 60%. Maybe if you zoom in real close you can see. But how often do you do that when browsing?

For images that have lots of colors, gradients, and shadows, JPG is the best choice. Example images are photographs of landscapes, people, and products. But JPG isn’t the best file type for every situation.
GIF
GIFs are a lossless compression format, which means it doesn’t lose any quality. This sounds great; why wouldn’t we save all images in a lossless format? A major drawback for the GIF file type is it’s limited to a maximum color palette of 256 colors. Take a look at our same example image to see the difference.

It might be hard to see at first but notice the stippling on the side of her face. Because of the limited color palette, GIFs don’t do well with complex coloring and shading.
So what are GIFs useful for besides animated memes? Their limited color palette makes them perfect for web images like logos, illustrations with solid colors, and simple icons.
GIFs also allow you to save these images with transparency; JPG does not. However, edges tend to be pixelated. In these cases, it’s best to save your GIF on a solid color that’s the same color as the background of your website. Here’s an example of the Sidecar logo, saved as a transparent GIF, then placed on a colored background.

Notice the rough and pixelated edges? No bueno. But don’t worry. There’s a fix for that later on.
If you don’t need transparency, you can certainly use JPG. But nothing beats GIF’s combination of quality and file size when it comes to these types of images.
Here’s a Sidecar illustration saved as both a JPG and a GIF. (The JPG was saved at 100% quality since images like these wreak havoc on JPG’s compression.)

They look identical but let’s take a look at file size.

GIF and its lossless quality are the winner here, reducing file size by over 80% compared to the JPG.
We joked about animated GIFs before but if you want animation, GIF is the only file type that supports it.
PNG
PNG is like the best of both worlds. It gives you the lossless compression of GIF with the unlimited color palette of JPG. But its lossless compression doesn’t make it a good choice for images with lots of colors. As far as file size is concerned, JPG is still the best choice.
When it comes to web images, you’ll want to use PNG like you do GIFs. Use it for logos, illustrations with solid colors, line drawings, and simple icons. So why not always use GIFs? If you don’t need transparency, then GIF is a great choice.
But remember that GIFs struggle a bit with transparency. If you need clean edges for a transparent image, choose PNG (or PNG-24 if using the “Save for Web” option). Let’s take a look at the Sidecar logo again saved as a PNG and a GIF.

See how much nicer the edges look. Now we can use this logo on the web over any dark background.
PNG also has much greater transparency options. With GIFs, only one color can be selected as transparent (usually white). For this reason, GIFs are either fully transparent or fully opaque. That’s why we get those nasty edges.
With PNG, there are different levels of transparency. That’s why the edges look so nice and smooth, because the pixels have varying levels of transparency.
Always be optimizing
There are a lot of ways to optimize images for the web. We hope this foundation gives you a better idea of how to find the right balance of quality and file size. While there aren’t any hard rules for optimizing, one thing is certain: you should always be optimizing.